
![How to paint wisteria using cotton buds [step-by-step tutorial]](https://birchandbutton.com/wp-content/uploads/2017/05/how-to-paint-wisteria-using-cotton-buds.jpg)
Fancy trying a quick and easy painting that’s achievable no matter how much painting you’ve done before? If so, try this method of painting with cotton buds! In this blog post, I’ll show you how to paint wisteria flowers with cotton buds.
Cotton buds are a really versatile painting tool. It’s surprising just how much you can convey with some simple dots! You only have to google pointillism for proof of that.
This painting project is clearly more abstract than any of the pointillist masterpieces, but I’m betting it’s much quicker to complete too.
To make painting with bundles of cotton buds easier, I’d recommend you use an elastic band or something similar to hold them together tightly. That might seem unnecessary, but trust me when I say it’s frustrating to end up with a streak across the page because a cotton bud slipped out of your hand. (And yes, that’s me speaking from experience…)
You may find that the cotton buds go a little flat and clumpy when you’ve tapped them onto the page multiple times. If that happens, you can start using the other end of the bundle or just grab some fresh ones.
You’ll notice that I’ve used watercolours and acrylics in this painting. This is just something I chose to do to get a really soft background. Acrylics can be thinned and used like watercolours, or you could try acrylic ink, but I decided to use actual watercolours for this one.
You can easily make this painting work with whatever supplies you have to hand. So as always, use what you have!

Sign up for my monthly emails of creative tips, tutorials and DIYs and get 31 free creative prompts!
You can unsubscribe at any time
How To Paint Wisteria Flowers With Cotton Buds Step-By-Step
Supplies needed
- Watercolour paper
- Masking tape
- Watercolour paints in different shades of green and yellow (I used my Winsor & Newton Cotman Watercolour Paint set)
- A large, soft brush
- Acrylic paints in white, purple, dark blue (for example this white, this purple and this blue)
- Cotton buds tied into small bundles of three (ideally the eco-friendly kind)
Step one
Use masking tape to tape the watercolour paper flat so it doesn’t curl up when you paint on it.
(If you aren’t working on an old table, make sure the surface underneath is protected. If you have a drawing board it might be a good idea to use this, or you could work on a sheet of cardboard.)
This step isn’t strictly necessary, but it makes this project much easier. If you choose not to do this and the page curls a little, flatten it out under a heavy book when it’s dry.
Step two
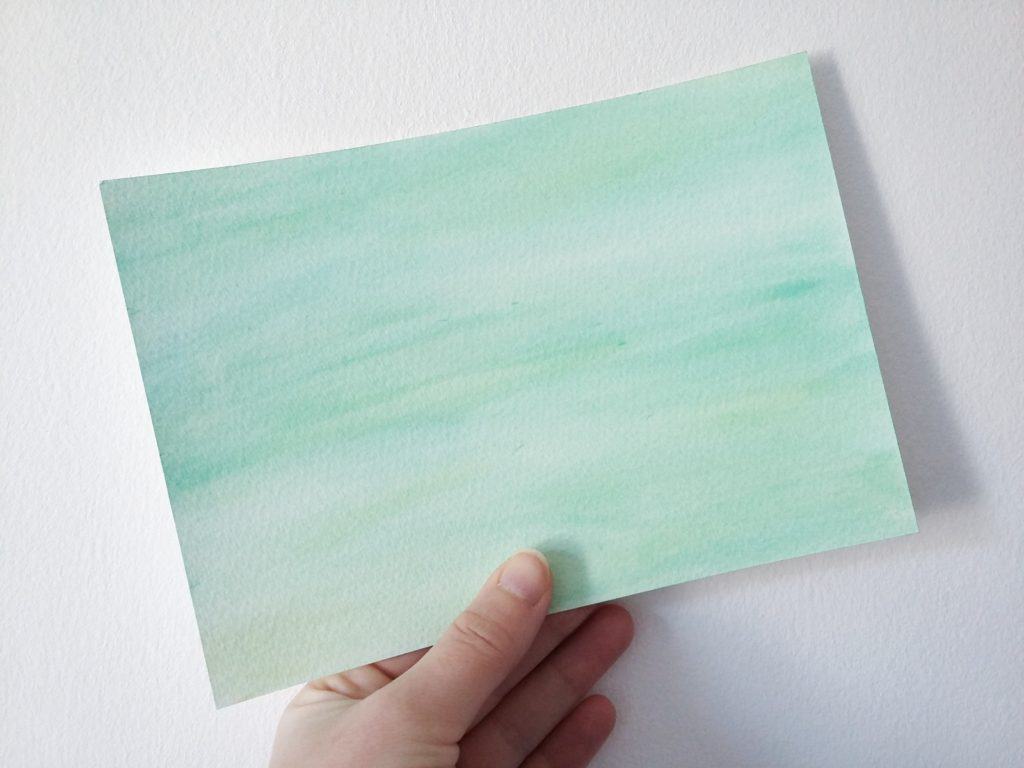
Dampen the brush and wet the entire sheet of watercolour paper.
Paint the entire sheet of paper in different shades of green watercolour paint, keeping the paint nice and wet so there are no sharp edges.
The idea is to create the effect of a blurred background, as in a photo where the wisteria flowers are sharp and in focus and the greenery in the background is blurred out.
Leave this to dry completely.
Step three
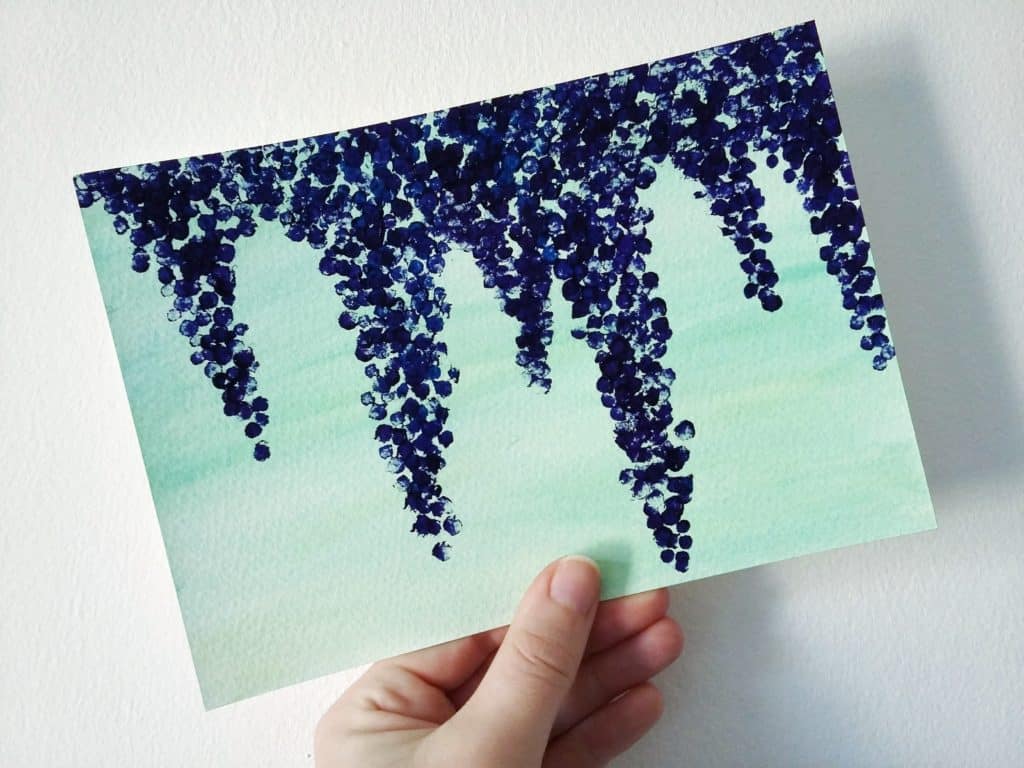
Squeeze out a little of the blue and purple acrylic paints. Grab a bundle of cotton buds and dab them into the paint, making sure you pick up a little of both colours. Don’t worry if they mix together or not, either way is fine.
Dab the cotton buds onto the paper, covering the top of the page with dots of colour and then working down to make some clumps of flowers. Wisteria flowers hang like bunches of grapes, so your clumps of flowers need to come to a point.
Pick up more paint regularly.
Step four
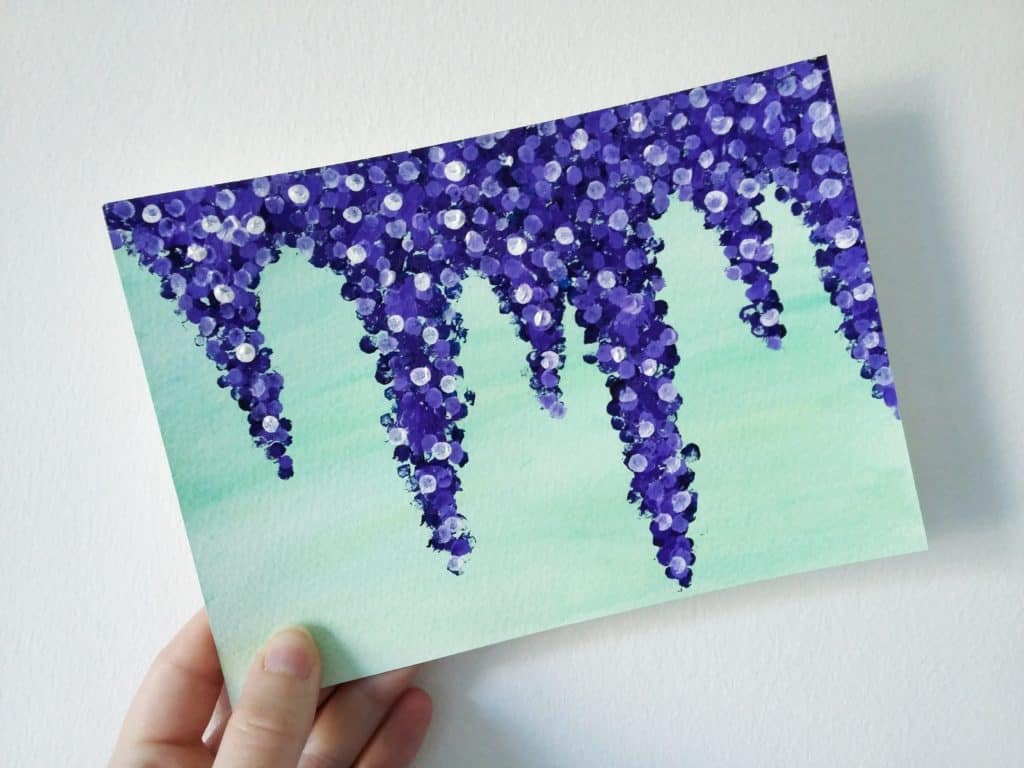
Get some fresh cotton buds and squeeze out a little white paint. Pick up some purple and a little white on the cotton buds and start to add that over the top of the blue-purple you’ve already painted.
Work across the page, adding a little more white each time to create lots of shades of purple, gradually getting lighter and lighter.
Flip or change your cotton buds when you feel you need to. If the colours seem to be mixing together too much rather than staying distinct, leave the painting to dry before continuing.

Step five
Finish the painting by taking a single cotton bud and some pure white paint. Add a few dots here and there, quite sparingly, to create a bit of highlight.
Then your wisteria flowers are all done!
About Stacey

I’m Stacey and I’m a blogger, abstract artist and freelance writer. My aim is to help busy people feel inspired and get more creative with tutorials, hints and tips.
I live in Cardiff with my partner and dog, and in my free time you’ll find me hiking, reading, painting or sampling a craft beer or two.