
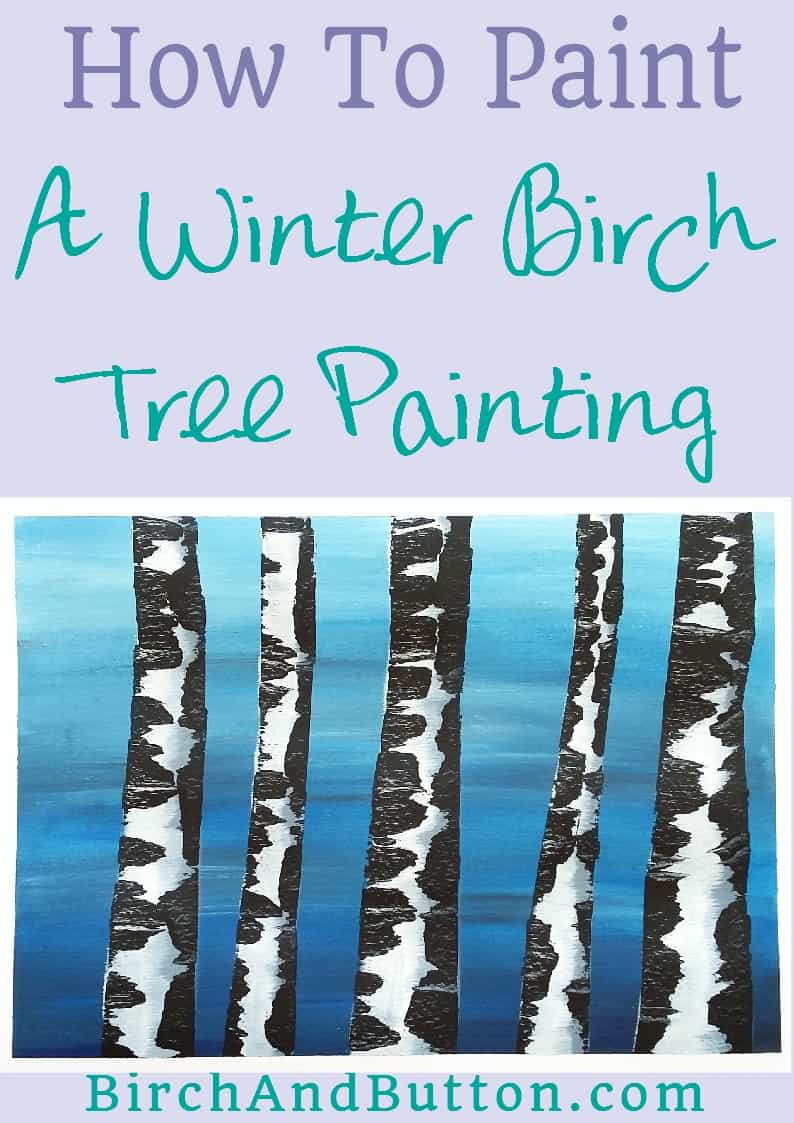
Let me show you how to paint a straightforward birch tree painting with acrylic paint. All you need is three paint colours, some paper, a paintbrush and an old credit card.
I LOVE painting with acrylics and I really wanted to make this simple tutorial available for anyone to have a go at. It’s much easier than it looks to achieve and doesn’t take hours and hours of painting.
Before we get into the step-by-step tutorial, I have a few quick tips and pointers that will hopefully make this project go as smoothly as possible.
Sign up for my monthly emails of creative tips, tutorials and DIYs and get 31 free creative prompts!
You can unsubscribe at any time
Painting the background
Firstly, if you look at the background in my painting, it’s pretty streaky. I really like this effect so I chose not to mix the colours before painting with them.
Instead I just loaded up my brush with a little of each colour and let the colours mix a bit on the page. Don’t go over and over the paint, though, or you’ll lose the effect.
Don’t worry about washing your brush as you work down the page painting the background. Just keep loading it up with paint and amending the colour blend as you go. The further down the page you go, the less white and the more blue and black you’ll put on the brush.
The paint dries quickly so you’ll need to work fast on the background. If you’ve not worked with acrylic paint much before, it’s important to bear this in mind as it’s frustrating trying to blend acrylic paints when they’re drying more quickly than you can paint.
There are mediums you can use to extend the drying time of the paint, but for the purposes of this painting that’s not necessary. Making the paint a little wetter with some water would help a bit.
Working with black paint
When you’re loading up the brush with the paint for the streaky background, be careful of how much black you use. It’s so strong, you really only need a touch.
If you’re worried about getting the right balance, try practicing on a piece of scrap paper first.
This goes for both when you’re mixing colours and when you’re applying the paint to the trees at the end. I think I could probably have used a little less black on a couple of the trees in my painting.
I actually like the left sides of the trees more than the right, and I think this has something to do with the patterns the paint has made.
Using a credit card to paint
When you paint with a credit card, you have a bit less control of the patterns created by the paint. This is a good thing because it looks really random and natural.
For the control freaks and perfectionists among us, it’s a good exercise in letting go… (I’m absolutely not speaking from experience. Ahem.)
And please, make sure you use an old card. Don’t use your current one! The paint dries so quickly that it probably won’t come off completely when you’re finished.
You could use a piece of cardboard if you don’t have an old credit card handy, and of course a palette knife would work too!
Drying your birch tree painting
It’s really important to make sure the paint is fully dry in between each step. Although acrylic paint dries really quickly (too quickly sometimes!) you can speed it up with a hair dryer.
I’ve heard that hair dryers can cause some paints to darken in colour. I think it’s something to do with the heat, although I’ve never experienced this personally. But just bear this in mind when you’re painting.
How To Paint A Winter Birch Tree Painting
Supplies needed
- Watercolour or acrylic paper, or some other thick paper (I used Daler Rowney Mixed Media paper)
- Masking tape (if you want the painting to have clean edges)
- Blue acrylic paint (I used phthalo blue)
- Black acrylic paint (I used mars black)
- White acrylic paint (I used titanium white)
- A medium flat paintbrush (I used a 1 inch brush)
- An old credit/loyalty card (or a piece of cardboard or palette knife, if you have one)
Step one
Start by masking off the edges of your paper. Don’t worry about this step if you’re not worried about your painting having neat edges.
Step two
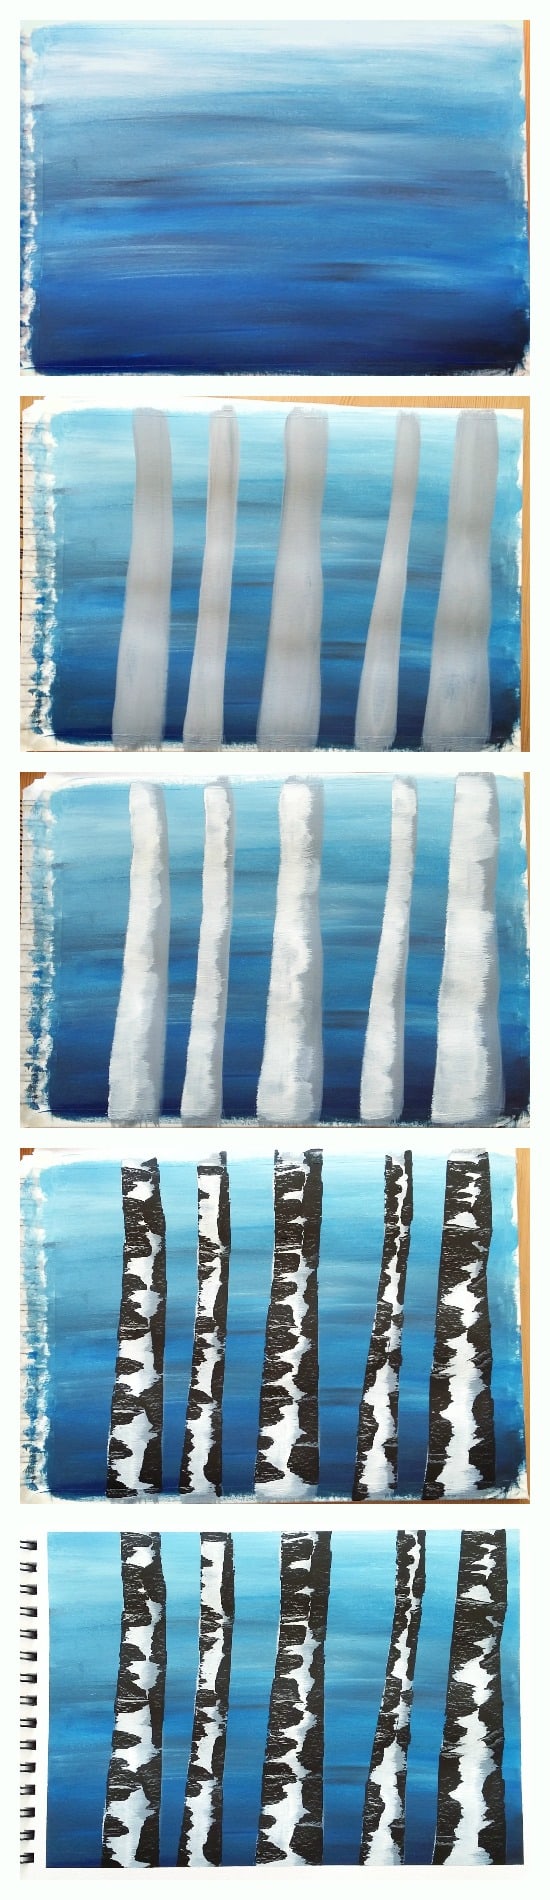
We’ll start by painting the background. Start by picking up a lot of white, a little blue, and a tiny, tiny touch of black on the brush. Paint horizontally across the page, back and forth.
As you move down the page, pick up more paint, adding more blue and more black the further you go down. When you get to the bottom of the page, just use a combination of blue and black – no white.
Let the painting dry.
Step three
Mix a light grey from a lot of white, a little black, and a tiny touch of blue. Paint the trunks of the trees in. Don’t worry if they’re a little wobbly – that just makes them look more natural!
Odd numbers tend to look best, but paint as many trees as you like.
Let the painting dry.
Step four
Make sure your brush is really clean and dry (or use another the same size). Pick up some pure white and dry brush it across one side of each tree trunk, roughly across half of the tree, or a little more. Keep the strokes horizontal.
It doesn’t matter which side of the trees you paint the white on, just make sure you are consistent and paint the same side of each tree.
Let the painting dry.
Step five
Take your credit/loyalty card and pick up a little black paint along one edge. Put the edge of the credit card against the page and drag it across.
Do this on both sides of the trees, keeping the strokes horizontal. Try not to go back over it again and again though, or you will destroy the pattern.
Let the painting dry, then remove the masking tape. Your birch tree painting is now finished!
For a wintery drawing project, try this: How To Draw A Winter Woodland Scene!
Or if you’re ready to learn more about acrylic painting, check out this article: Acrylic Painting Terms: A Glossary For Beginners!
Did you enjoy this tutorial? Let me know in the comments!
About Stacey

I’m Stacey and I’m a blogger, abstract artist and freelance writer. My aim is to help busy people feel inspired and get more creative with tutorials, hints and tips.
I live in Cardiff with my partner and dog, and in my free time you’ll find me hiking, reading, painting or sampling a craft beer or two.