
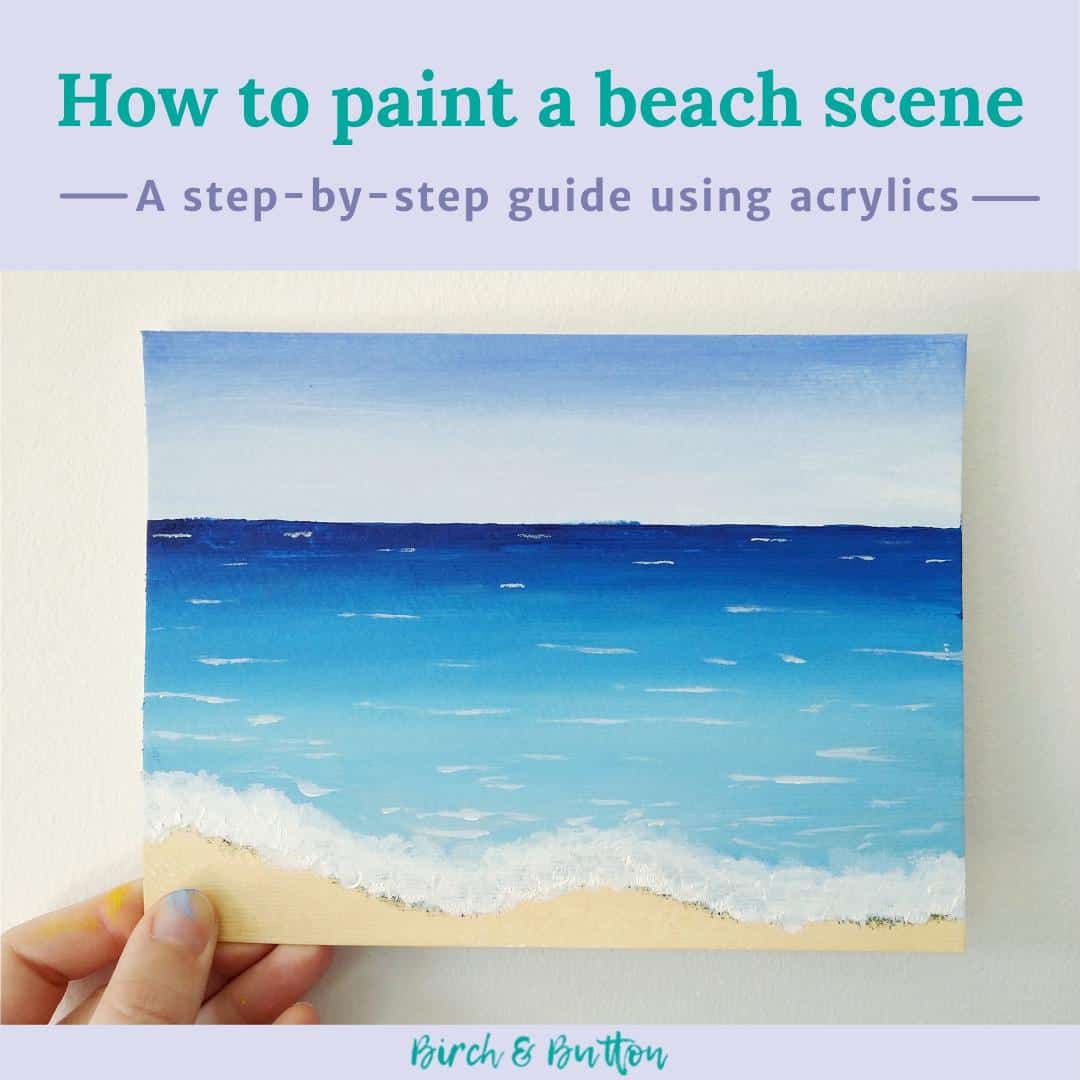
In my last post, I showed you how to paint watercolour ice cream cones and I also said things were going to get pretty summery around here. And this tutorial for a quick and deceptively simple beach scene painting is right on theme!
If you’re looking at this project and thinking “Deceptively simple? There’s NO way I’m going to be able to do that!”, trust me — you absolutely can.
I have a few hints to help make this painting as straightforward as possible, and breaking it down into stages really simplifies the process.
Sign up for my monthly emails of creative tips, tutorials and DIYs and get 31 free creative prompts!

You can unsubscribe at any time
How to paint a simple beach scene: hints and tips
Choosing a blue paint
First things first, my biggest tip: use one shade of blue acrylic paint for the sky and another for the sea. I’m using ultramarine for the sky and phthalo blue for the sea. This is because standard phthalo blue has a more greeny tone that suits the sea best.
But you may also know that I tell you to use what you have. So if you just have “blue” acrylic or craft paint, add a little green or an even tinier touch of yellow to give the sea a very subtle trace of green.
What to do if you don’t have yellow ochre
We use yellow ochre for the sand, but there’s also a workaround for that. You can mix a tiny bit of purple (or a dot of red and a dot of blue) into some yellow to get a similar effect. The important thing is that the sand isn’t bright yellow.
When I first created this tutorial and took the pictures you see in this blog post, I used yellow ochre. But when I came to record the video you’ll see below, my yellow ochre had dried up! So if you want to see me use the workaround, you can in the video below.
Two final tips
Finally, here are two more super quick tips before we get into the tutorial:
- Make sure the horizon is straight and parallel to the top and bottom of the page. A wonky horizon line will make your painting look odd!
- Keep your brushstrokes horizontal as much as possible. This just gives a more realistic effect, and I find it makes blending a little easier.
How To Paint A Simple Beach Scene With Acrylic Paint
Supplies needed
- Watercolour/acrylic paper (if you don’t have this, thick paper or thin card will do. If it buckles, flatten the painting under a stack of books when it’s dry.) In the video above, I worked in my Canson XL Mixed Media pad.
- A medium-sized flat paint brush
- Acrylic paints in ultramarine blue, phthalo blue, yellow ochre, and titanium white (see above for workarounds)
- Painter’s tape (masking tape will do but it may take the surface off your painting if you’re not very careful. You can also heat the tape gently with a hair dryer before removing as this makes it easier to peel without lifting paint too.)
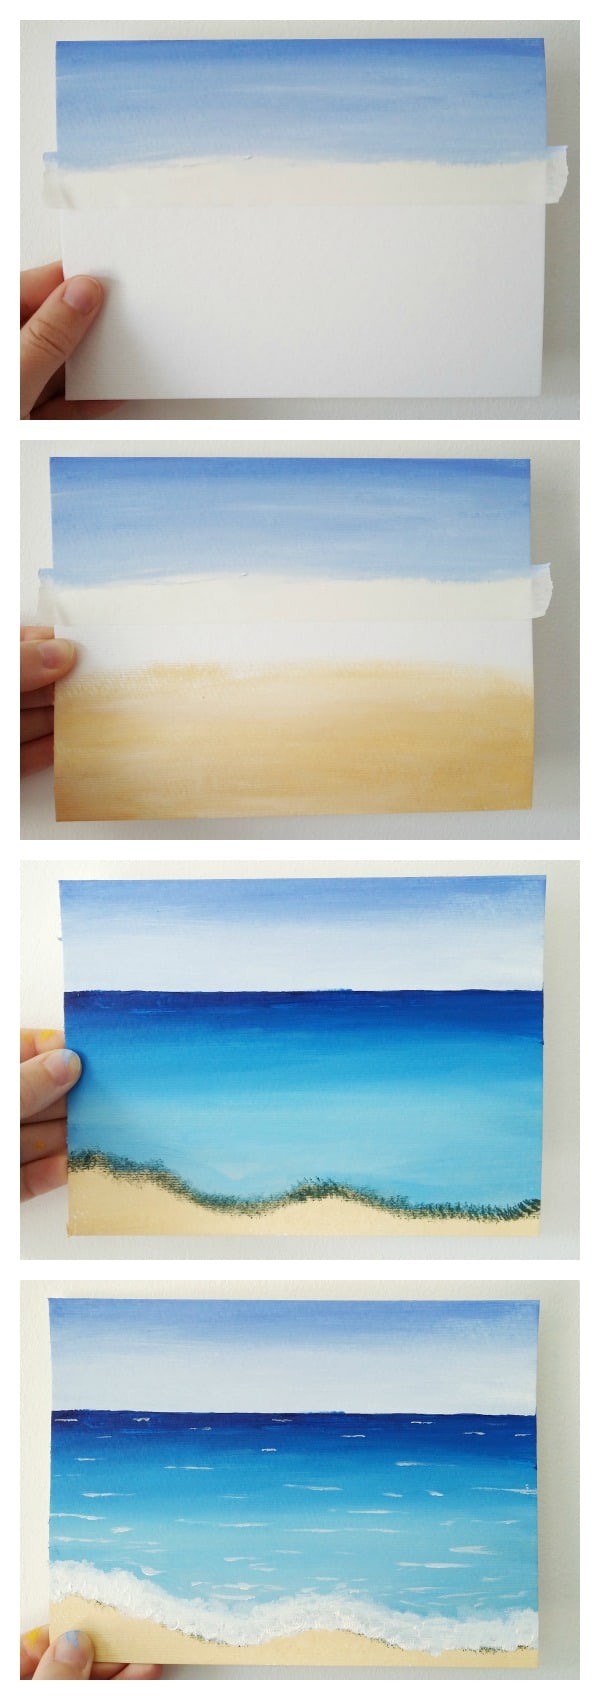
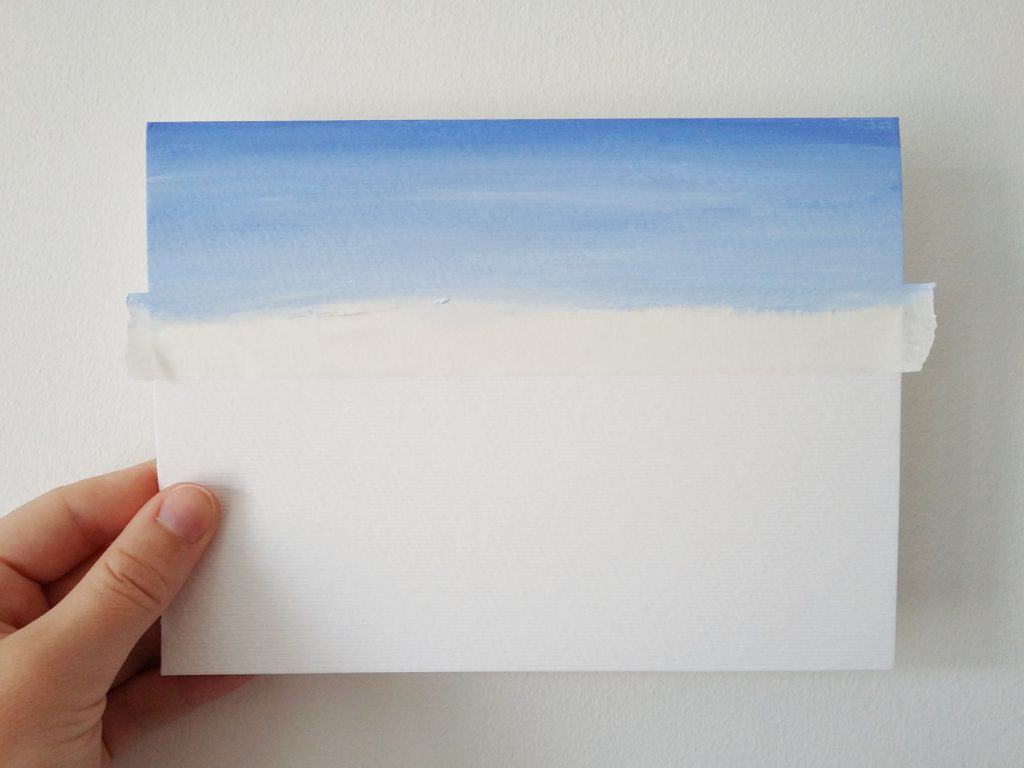
Step one
We’re going to start with the sky. Stick a strip of tape across your page about a third of the way down. This will be the horizon line.
Try to make sure it’s parallel to the top of the page, otherwise you’ll have a wonky horizon!
Step two
Dampen your brush, then mix some ultramarine blue with a little white. Start at the top of the page and paint long strokes across it.
As you work down towards the tape, add more and more white into the mix until the blue at the horizon is fairly pale.
You should end up with a nice graduated sky. Don’t worry if it’s a little streaky as the streaks will just look like clouds.
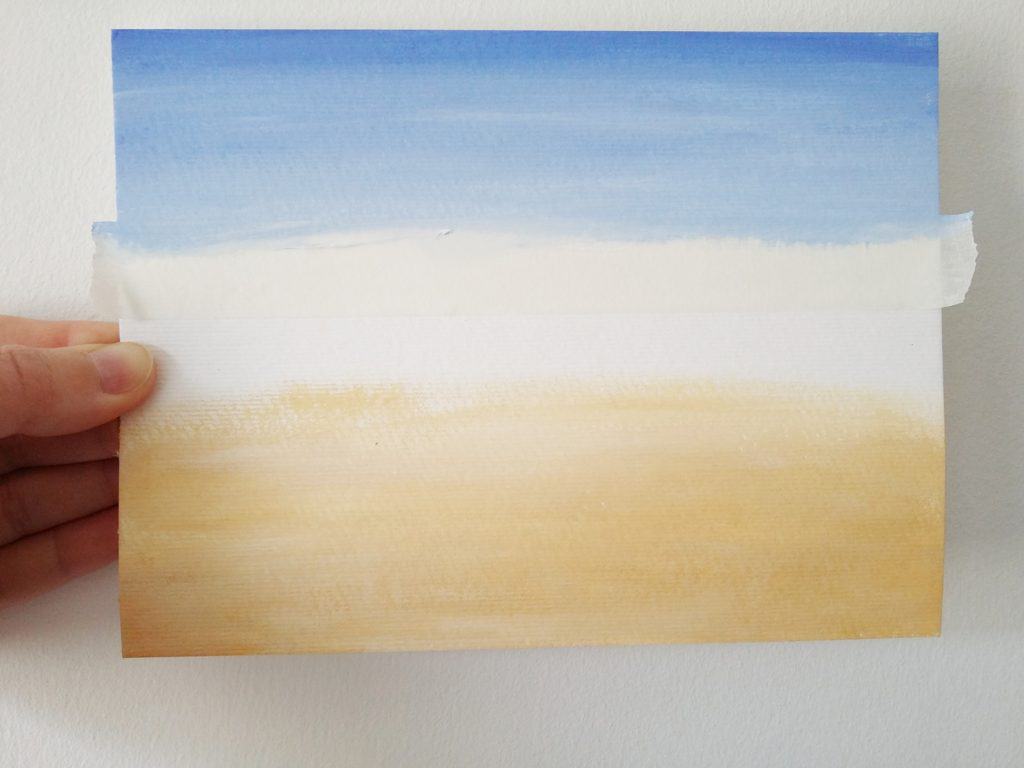
Step three
We’re now going to start on the sand. Wash your brush really well or grab a clean one. Then pick up a little yellow ochre and mix it with some white to make a pale yellow ochre.
Start from the bottom of the page and work up to cover at least the bottom third. We’ll bring the sea down over it, so don’t worry about making a neat edge.
And it’s also fine if the colour isn’t even and uniform the whole way across — it looks more realistic that way.
Step four
Now we’ll move onto the sea. Remove the tape from the horizon. As long as the sky is dry, stick another piece the other side of the horizon to keep the sharp edge.
Pick up some phthalo blue on a clean brush, mix in a tiny bit of white, and start painting horizontal strokes along the horizon line.
As you work down the page, add more and more white until you have a very pale blue where the waves wash up on the shore.
Make sure you bring the water down over the sand, and paint an uneven edge along the shore.
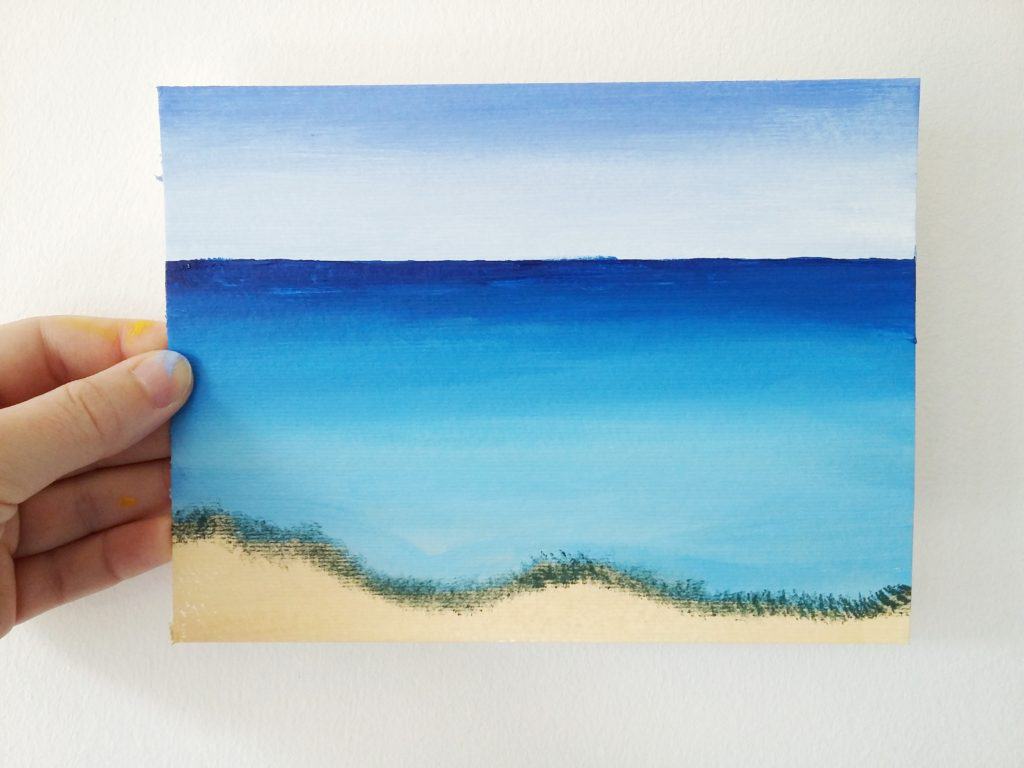
Step five
Mix a tiny bit of blue and a little yellow ochre to make a kind of brown. Hold the brush upright and use the tip to add a rough line along the edge of the water.
This will be a shadow. I know it doesn’t look like it at this stage but it will make all the difference in the end!
Let the painting dry.
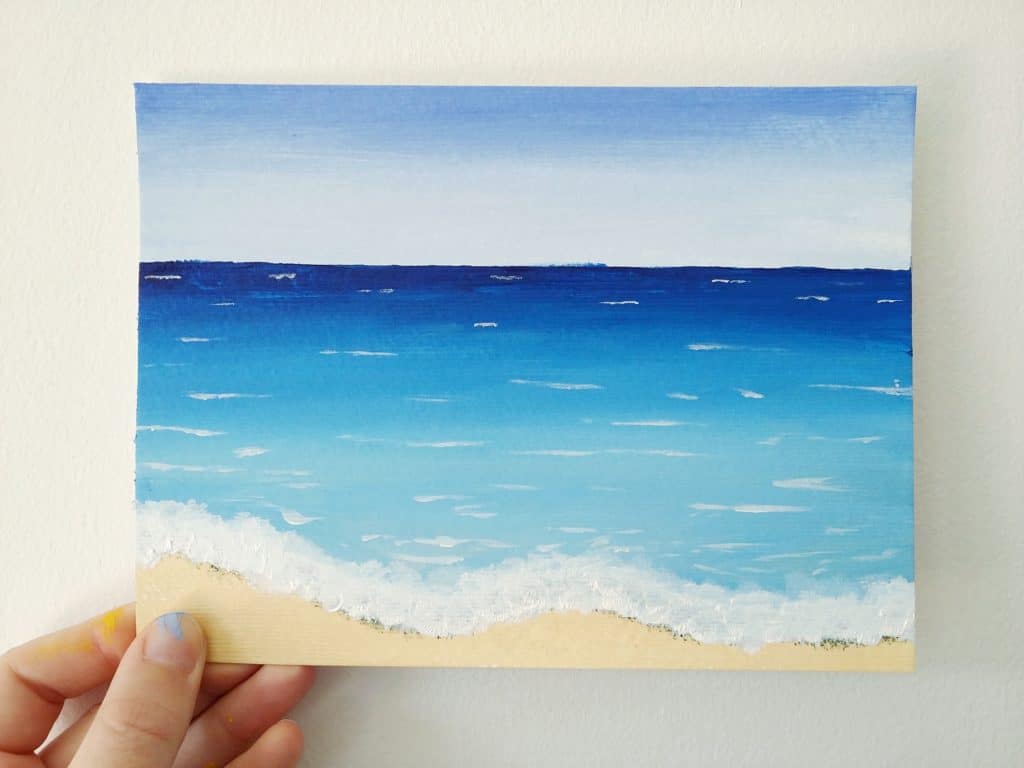
Step six
Remove the tape. We’re now going to add some white details. Dab some white paint onto the sea where it meets the shore to make foam. Try not to make it too uniform and make sure a bit of white goes over the shadow you painted.
Make a few horizontal marks in the sea further back, for a little distant foam. Make sure the marks get smaller the further back you go.
And there you have it — you’ve just painted a simple beach scene!
Want to take this further? Check out 9 Ways To Make A Mixed Media Beach Scene!
And if you’re ready to learn more about acrylic painting, check out this article: Acrylic Painting Terms: A Glossary For Beginners!
About Stacey

I’m Stacey and I’m a blogger, abstract artist and freelance writer. My aim is to help busy people feel inspired and get more creative with tutorials, hints and tips.
I live in Cardiff with my partner and dog, and in my free time you’ll find me hiking, reading, painting or sampling a craft beer or two.
Your tutorial was so helpful! I now have a gorgeous looking beach scene! Thank you! 🙂
thank you for a simple and informative tutorial. I found this very helpful and made a nice simple pic I may take to my office. Only comment is that when you say to mix yellow orchre with blue you do not say which blue so I had to experiment. It might also help to say it can be more blue than brown (spent alot of time making bown to see that it was really a mix with deep blue to shadow thw surf.
Anyway – great for me. Thank you!
Thanks very much. It’s very helpful for me. I just started oil painting. I will try this surly.
That was easy and amazing!!!`thank you!!!
I’d love to paint something like this but on canvas for a wall in a bedroom. So some much larger . I love your easy directions and the colors. Blue’s my favorite colors.
Would love any suggestions.
Thanks
Carolin
Thank you..I paint my fence…so EASY because of you instructions
Thanks for the instructions.. it would be nice to be able to see all the pictures in the article..however I am not able to see those pictures for some reasons.
Very nice explanation of how to paint a simple but beautiful beach scene. Thank you.