
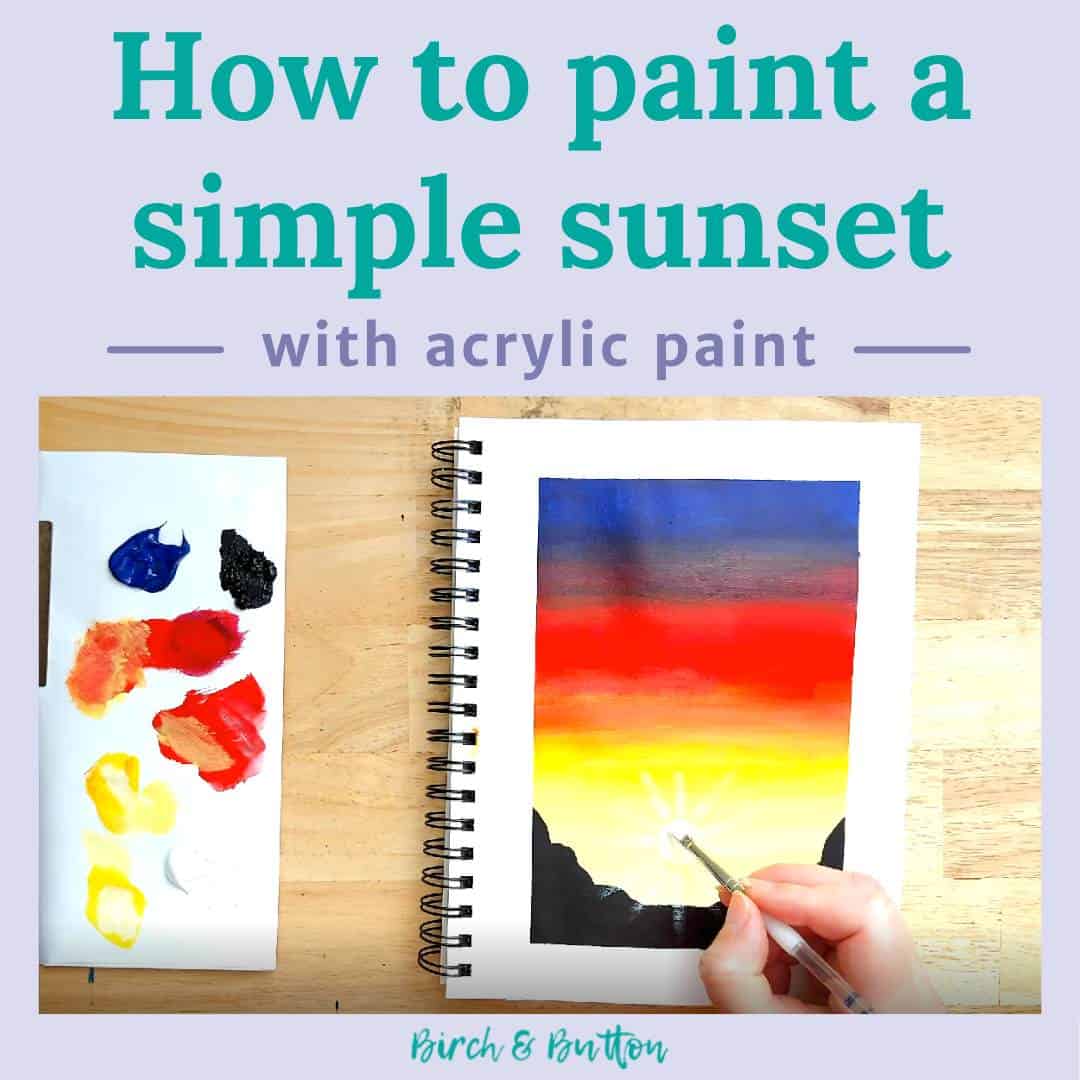
It’s time for another step-by-step acrylic painting tutorial, and this time we’re looking at how to paint a sunset. There are nine simple steps (plus a couple of other optional ones), plus a paint-along video to guide you through the process.
First things first, let’s start by talking about blending acrylic paint. That’s a key part of this painting after all!
Sign up for my monthly emails of creative tips, tutorials and DIYs and get 31 free creative prompts!
You can unsubscribe at any time
Blending acrylic paint
One thing I’ll say from the off: don’t worry about creating a perfect, streak-free blend. A few streaks will just look like clouds and create a bit of realism. While realism isn’t really the goal of this project, it adds to the charm of the painting.
When you’re blending acrylic paint it’s best to work quickly. That’s especially true if it’s a hot day like it was when I recorded the video tutorial below!
I found it easiest to have a selection of brushes to hand. That way, you don’t have to try and wash your brush when you change colour, which will just slow you down and give the paint time to dry and become harder to blend!
Ideally, you’ll switch brushes after each blend. What I mean by that is you’ll blend the pink into the blue using one brush, then switch to blend the red into the pink, then again to blend the yellow into the red, and so on.
Doing this means your colours will stay bright and won’t get muddy. If you try and use the same brush, thinking you’ll be able to quickly wipe it off and continue painting, I can guarantee that by the time you’re painting the yellow section, it’ll have a slight hint of green due to there still being some blue somewhere in the depths of your brush.
I know this, because I’ve tried just to see if I could get away with just using one brush 😅 (I mean, who wouldn’t prefer to just wash one brush at the end of a painting project rather than five?!)
Choosing your colours
If I’ve said it once, I’ve said it a thousand times – I strongly encourage you to try this project using the paint you have already.
I’ve shared the exact colours I used so you can use those colours if you have them, but otherwise just use them as a reference.
Any blue, pink, red or yellow will work to make this sunset painting.
Adding the sun’s rays
You’ll notice the final step in the tutorial is adding a few rays of light coming from the sun.
I’d recommend practising on a scrap of paper rather than jumping straight into adding to your painting. This is because it can be easy to misjudge the amount of paint on the brush and the amount of pressure you’re using.
To make this easier, you’ll want a fairly dry brush without too much paint, so wipe any excess paint onto a paper towel after you’ve finished painting the sun.
The other important thing is to use very little pressure when you add the sun rays. And try to space them evenly around the sun. The idea is to create the suggestion of soft light radiating out from the sun as it sets, rather than distinct lines.
You know how a child draws the sun with lines coming off it? That’s not the effect we’re going for, as cute as it is!
How to paint a sunset with acrylic paint: step-by-step tutorial
Supplies needed
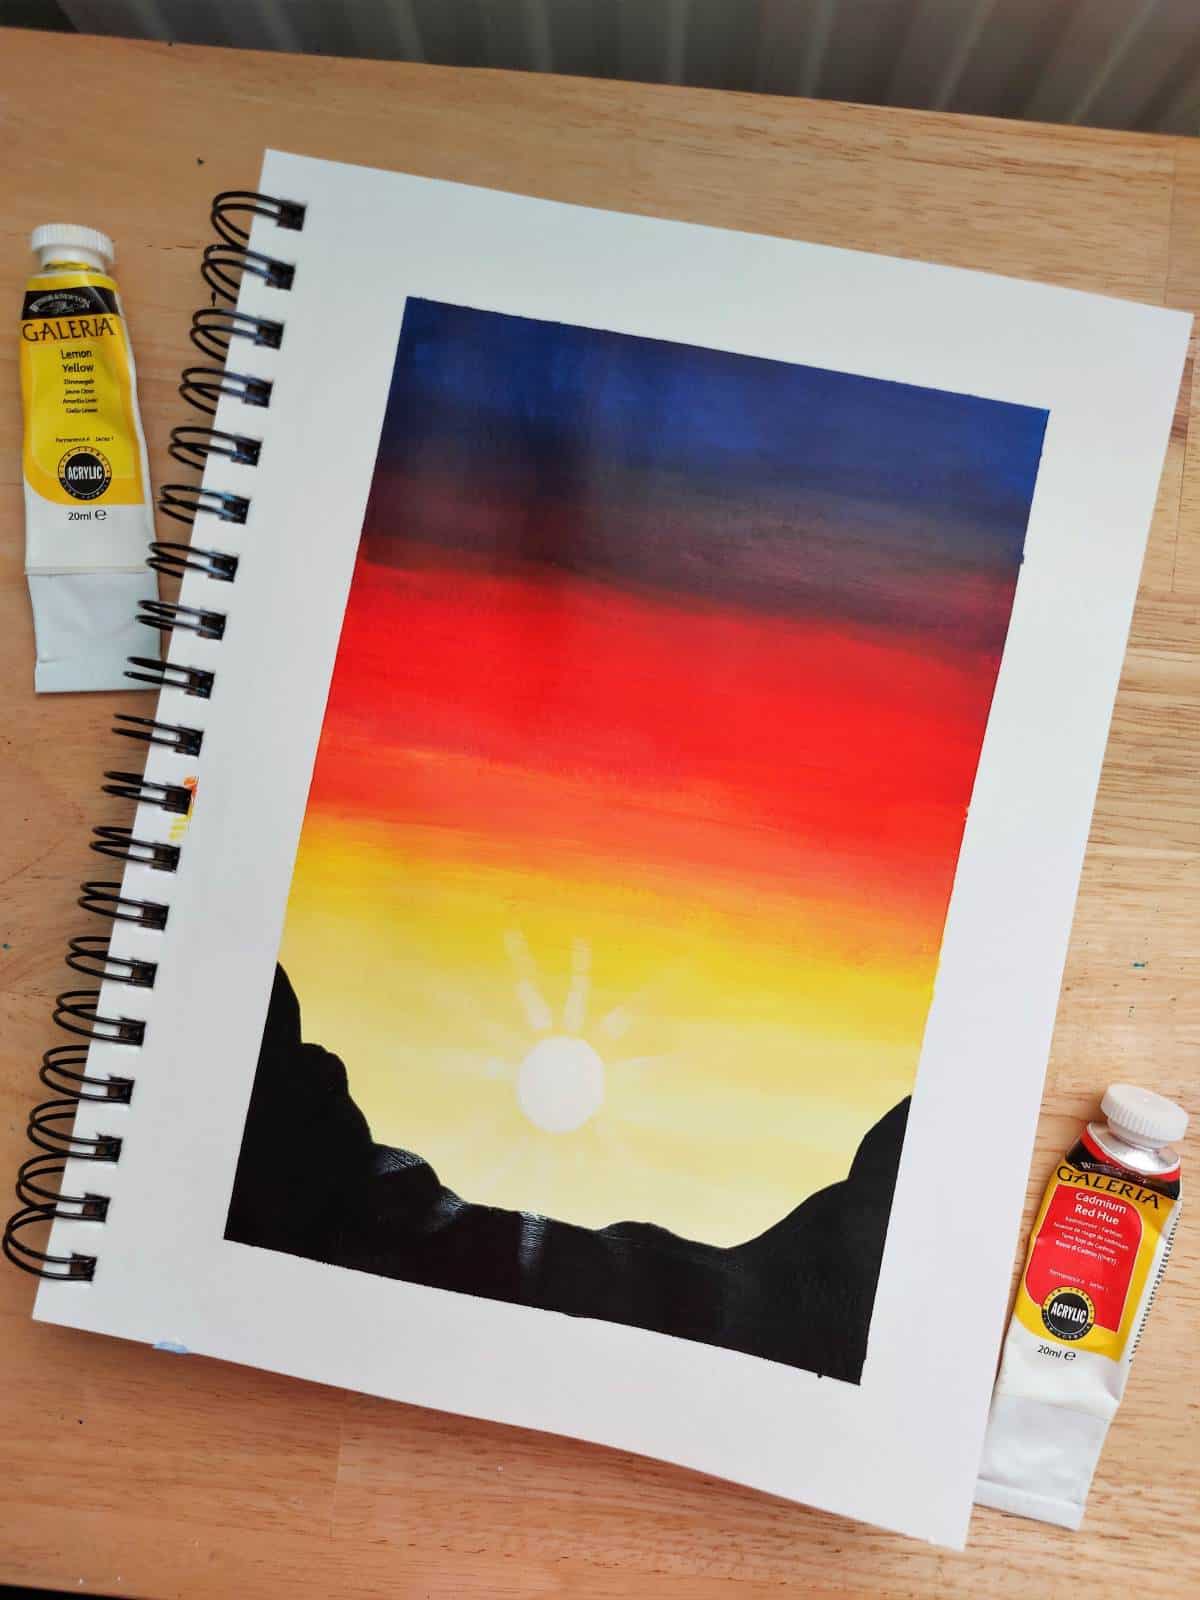
- Acrylic paint in dark blue, pink, red, yellow, white and black (the exact paints I used are phthalo blue, process magenta, cadmium red, lemon yellow, titanium white and mars black)
- A sketchbook or some acrylic paper to paint on (I used my Canson XL Mixed Media pad)
- A selection of different size paintbrushes (I used a range of flat brushes)
- A jar of water
- A paper towel to remove any excess paint from your brush
- Masking tape (optional)
Step 0.5 (optional)
If you’re painting in your sketchbook, you might like to mask off the edges of the page to create a crisp border. Or you can just paint up to the edge of the page if you prefer – it’s completely your choice.
Step 1
Wet your brush and squeeze out any excess water on the side of the jar. (You want your brush to be damp, not full of water.)
Pick up some of the dark blue paint and paint a thin strip at the top of the page.
Step 2
Wipe your brush on the paper towel to make sure there’s only a little blue left, and pick up some pink. Blend it into the blue, then continue painting a strip of pink, picking up more paint when you need it.
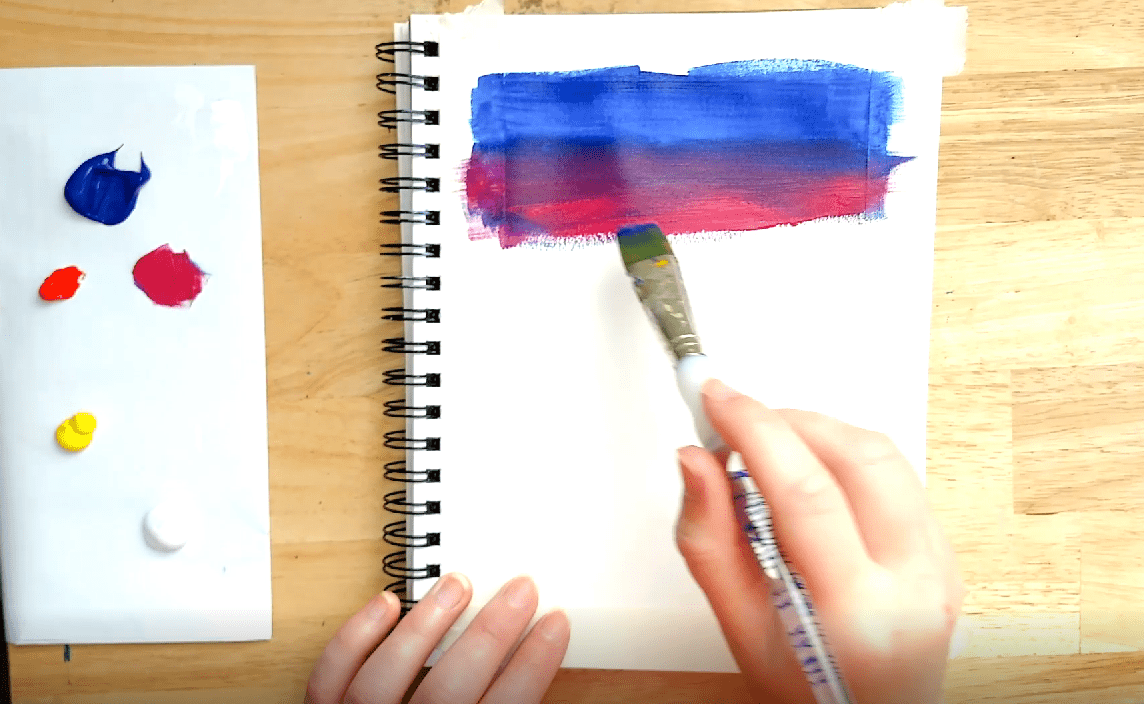
Step 3
Grab a clean brush and pick up some red, blending it into the pink before painting a thin strip of red.
Step 4
Wipe your brush on the paper towel to make sure there’s only a little red left, and pick up some yellow. Blend it into the red, then continue painting a strip of yellow, picking up more paint when you need it.

We’ll make this strip a bit wider than the others, so take it down to almost the bottom of the page.
Step 5
Get another clean brush, and blend a little white into the bottom of the yellow strip.
Step 6
Grab a small brush, mix a little yellow with some white paint. Then paint a small circle in the yellow strip. This will be the first layer of the sun.
Leave to dry.
Step 7
Mix up an even paler yellow by mixing a tiny bit of yellow with some white. Go over the sun with this lighter colour.
Step 8
We’re now going to paint the land below the sunset, using pure black paint and another clean brush. It’s entirely up to you what shape the land takes – I decided on some distant hills.
Make sure the land comes up over the sky so there’s no white paper showing between the sky and the land.

Step 9
Let’s go back to the sun for the finishing touches. Wipe the brush you were using so there’s only a little of the pale yellow paint left, then pick up some white. There will be enough yellow left on the brush to give it the tiniest hint of yellow, which is all we want. Go back over the sun one last time.
You can now remove the masking tape if you used it. (Top tip: use a hair dryer to heat the tape slightly. The heat loosens the tape’s adhesive so you shouldn’t tear the paper when you remove it.)
Step 10 (optional)
You can now add some sun rays if you like (see the section above for tips).
To do this, take the brush you were just using to add to the sun and wipe any excess paint off. You want a fairly dry brush without too much paint for this to work well.
Then, with very little pressure, paint straight lines radiating out from the sun. There should be just a suggestion of paint on the paper, rather than a distinct line. This helps to give the impression of soft light coming from the sun as it sets.
And that’s it – that’s how you paint a sunset using acrylic paint!
If you enjoyed this painting tutorial, you might also like one of these:
- How To Paint A Simple Beach Scene With Acrylic Paint
- How To Paint Lavender Flowers With Cotton Buds
- How To Paint A Rainbow Watercolour Dandelion
About Stacey

I’m Stacey and I’m a blogger, abstract artist and freelance writer. My aim is to help busy people feel inspired and get more creative with tutorials, hints and tips.
I live in Cardiff with my partner and dog, and in my free time you’ll find me hiking, reading, painting or sampling a craft beer or two.