
Layering watercolour pencils needn’t be tricky. Let me show you the different effects you can achieve and take away the guesswork if you’re just getting started with watercolour pencils. Read on for more information.
This post is a follow-up to two popular posts on the blog, Getting Started With Blending Watercolour Pencils and Getting Started With Watercolour Pencils: Working With Wet Paper. It seems you guys are really into drawing and painting with watercolour pencils!
Today I’m focusing on layering colours and once again I’m using my set of Reeves watercolour pencils. I was asked a question about layering watercolour pencils and more to the point, if it is possible to layer them up to help intensify the colours in a painting/drawing.
(I’m still having an internal battle about whether to describe a watercolour pencil project as a painting or a drawing! I can’t get my head around the idea of “painting” with a pencil, but then “drawing” a painting isn’t right either…!)
Anyway, enough about that. Let’s get into the different ways you can layer watercolour pencils!
Sign up for my monthly emails of creative tips, tutorials and DIYs and get 31 free creative prompts!
You can unsubscribe at any time
Getting Started With Watercolour Pencils: Layering Colours
Stage One
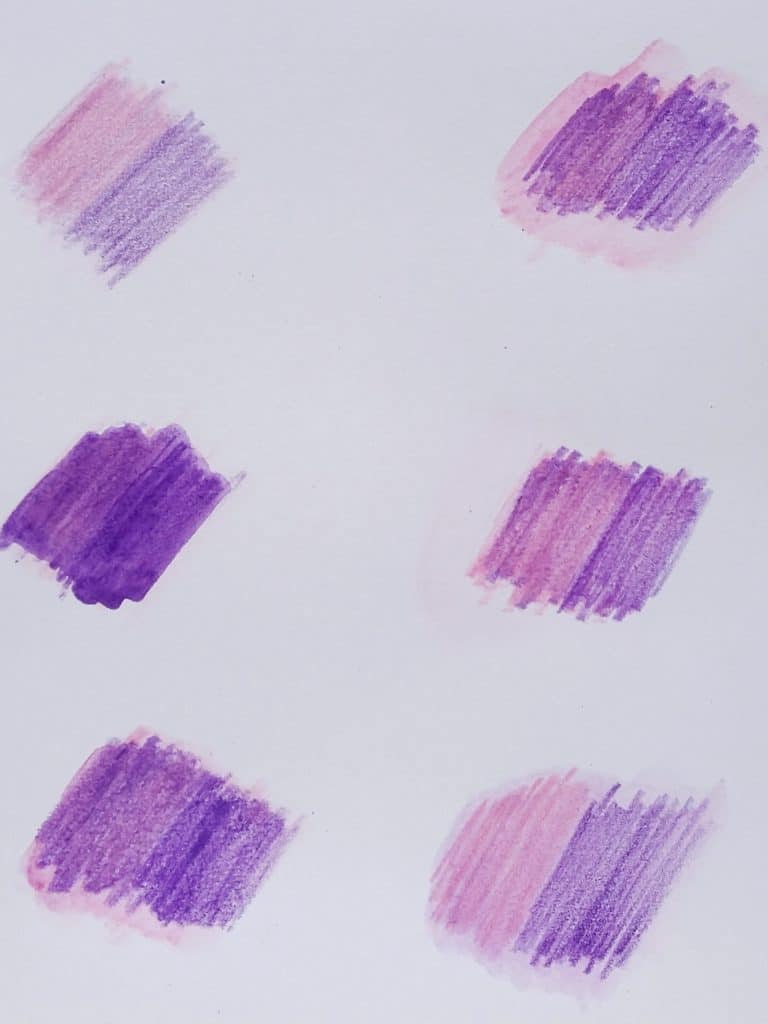
I started this experiment by colouring a selection of swatches using a pale pink and a dark purple pencil and a number of techniques.

The left column, from top to bottom:
- Dry pencil on top of dry pencil
- Wet pencil on top of dry pencil
- Wet pencil on top of wet pencil
The right column, from top to bottom:
- Dry pencil on top of wet pencil
- Dry pencils layered on wet paper
- Dry pencil on top of dry pencil, dampened AFTER being layered
I hope all that makes sense!
You can see from the image that the intensity of colour really varies, as does the amount of each colour showing. The darker colour is more prominent, as you might expect, but this can be controlled to a certain extent by the amount of pressure you apply. However, it’s important to note that this only works when the pencils and paper are dry. (For more information on working with wet paper, read this post.)
Stage Two
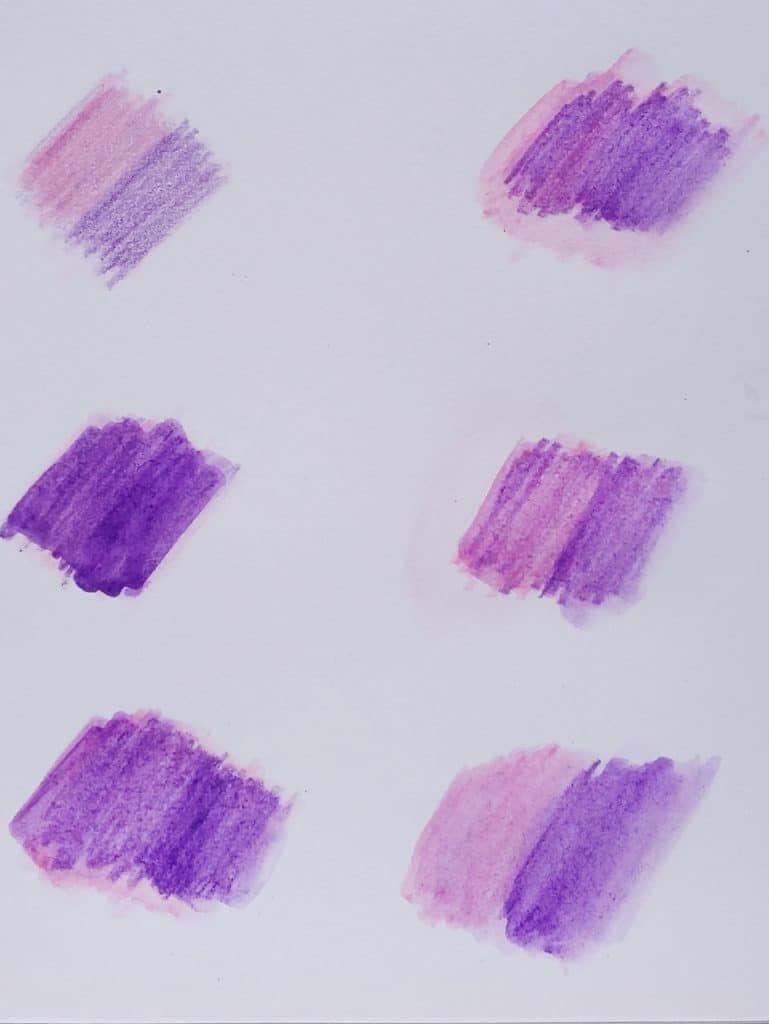
After the initial layered swatches had dried, I decided to try another layer of colour. On each swatch I coloured the upper/left half pink and the lower/right half purple.
You can see in the image above that this intensified the colour in all cases except where the colour was already very intense. (Although it still added another subtle dimension to the very intense swatch.)
Stage Three
The best thing about watercolour pencils is that they can give the same effect as watercolours, but that obviously involves adding water. So I wondered how the swatches would hold up if I blended them with water again. I went over each swatch (apart from the top left) quickly with my water pen once more. You can see the effect of this in the photo below.
In my opinion, this is where you need to be careful when layering up watercolour pencils. If you wet the same area over and over, you can end up doing one of two things.
Firstly, depending on the colours you’re using, you could end up blending them together completely. This renders the whole layering exercise pretty much redundant and can also result in muddy colours if you’re not careful.
Secondly, depending on the thickness and quality of your paper, you can end up removing the surface of the paper and causing some bobbling. The colours can also turn a little grainy.
In conclusion…
Just to summarise, you can achieve all sorts of effects by layering watercolour pencils in different ways. But there are a few things to be aware of to get the best results possible:
- Don’t keep wetting layers of colour, even if you’ve allowed them to dry each time. You’ll end up destroying your colours or making your paper disintegrate.
- Bear in mind that dry pencils or pencils on dry paper will produce a less intense result than wet pencils or pencils on wet paper.
- Consider how you’re layering your colours. Don’t forget that paler colours won’t show up so well over darker colours, and darker colours might overcome paler colours if layered on top. This is especially true if the paler colour is used dry and the darker colour is used wet.
I hope this blog post helps you decide how best to use your watercolour pencils for future art projects.
Do you have any tips for layering watercolour pencil colours? If so, please share them with everyone in the comments below.